Unlocking personalized eLearning is much easier with custom launch data in Content Controller!
Tired of building separate versions of your courses for every client? This article and webinar shows you how to leverage custom launch data to create a single Articulate Storyline project that dynamically adapts to each assigned account. Luckily, right within Content Controller, we have a way to utilize custom launch data, and our very own Stephen Kalnoske shows you step-by-step how to use it.
Here is everything covered:
- How to pass dynamic data (like custom introductory text, colors or quiz settings) into your Storyline course at runtime.
- A practical, step-by-step example of using JavaScript and Storyline’s API to fetch and apply custom data.
- How to configure custom launch data within Content Controller and export a universally adaptable course package (e.g., cmi5).
Start maximizing flexibility and streamline your content development process with custom launch data. You can watch his whole breakdown in the full webinar or check out the guide and the clips that go over the specifics with implementation in Content Controller and the Articulate Storyline course.
Setting up custom launch data in an Articulate Storyline course
Setting up custom launch data in Content Controller
Introduction
Custom launch data in Content Controller is a powerful tool that lets you pass data into a course at runtime. This is usually (but not limited to) customizations around colors, text, logos, number of quiz questions, passing scores, etc. It allows you to build one eLearning project and adapt it based on the account you are dispatching to.
For a good technical overview, see this page. This article gives an example of how to adapt an Articulate Storyline project to use custom launch data to show an introductory page for a specific Content Controller account.
Our Articulate Storyline project
Project overview
Our project is a little flight manual training, which our example company sells to airlines and flight schools. Some customers want to be able to offer a personalized introduction inside the course. Normally, this would mean creating different versions and builds of the course for each customer. But with custom launch data, we can accomplish this still using one base Storyline project!
Setting up the project structure
I have a few slides of a Flight School training course in Storyline.
The first slide is a simple title slide.
The second slide is a custom message slide we can populate using custom launch data.
The third slide is our actual training slide. Learners press the start button for the plane engine and get their completion.
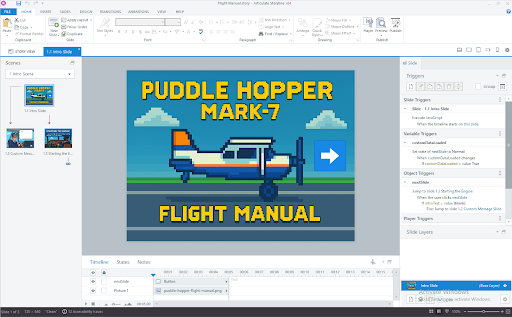
I’ve also set up 2 variables: customDataLoaded and introText. customDataLoaded is a True/False boolean that controls the visibility of the next arrow in the title slide. We don’t want the arrow showing up until we’ve completely loaded the custom data. After we fetch the custom data, we will populate that into the introText variable.
In the Object Triggers, you can see a little bit of the magic happening. When the learner clicks the arrow to go to the next slide, we’re going to read the introText variable. If there’s no intro text, we’re going to skip the custom message slide and go straight to the training. If there is intro text, we’re going to go to the custom message slide and display that text.
Setting up the Javascript
Since the URL to get the custom data is only available for a short period of time, we want to grab it and store it right away, when the first slide starts. I have a slide trigger to Execute Javascript when the timeline starts, with the javascript here:
(async function() {
  var player = GetPlayer();

  try {
    const url = new URL(window.location.href);
    const cpUrl = url.searchParams.get("cp");
    const fetchUrl = url.searchParams.get("fetch");

    let customParamsUrl;

    if (cpUrl) {
      // ✅ Direct use of cp param for SCORM 1.2, 2004 and AICC
      customParamsUrl = cpUrl;
    } else if (fetchUrl) {
      // 🔍 Fallback: parse fetch URL for extCfg and CustomParams for CMI5/xAPI
      const decodedFetchUrl = new URL(fetchUrl);
      const extCfg = decodedFetchUrl.searchParams.get("extCfg");
      if (!extCfg) return;

      const decodedExtCfg = decodeURIComponent(extCfg);
      const match = decodedExtCfg.match(/CustomParams\|([^!]+)/);
      if (!(match && match[1])) return;

      customParamsUrl = decodeURIComponent(match[1]);
    } else {
      return; // neither cp nor fetch found
    }

    // 🔥 Await the GET request
    const response = await fetch(customParamsUrl);
    if (!response.ok) throw new Error("Network response was not ok");

    const data = await response.json(); // Expect JSON
    if (data && data.custom_param) {
      player.SetVar("introText", data.custom_param);
    }

  } catch (e) {
    console.error("Error in CustomParams flow:", e);
    // leave introText as it was set in Storyline
  } finally {
    // ✅ Always mark loaded at the end
    player.SetVar("customDataLoaded", true);
  }
})();
A couple things to note in the code. The var player = GetPlayer() and player.SetVar(...) code is all part of Storyline’s official Javascript API.
Setting custom launch data in Content Controller
Once we’ve completed the project set up, we export it as a learning standard (I used cmi5) and import it into Content Controller.
Once you have it in an account, select the content and go to the Advanced tab and click Edit to add the data. We’re going to just make a little introduction like so:
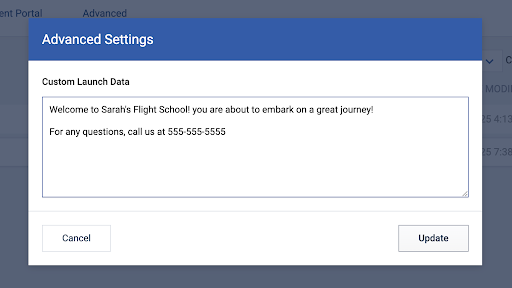
Click on Update, and you’re good to go. Export the content and drop it into your LMS.
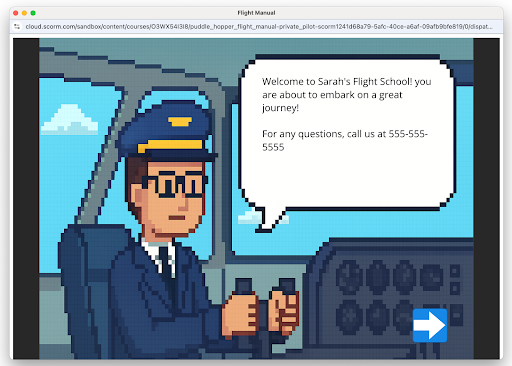
Testing
I uploaded the dispatch package to SCORM Cloud to test and voila! You can see the introduction text was successfully pulled down.
Wrap-up
So there’s an implementation of custom launch data inside a Storyline course. Custom launch data gives you great flexibility in customizing and adapting your courses based on which account you’re dispatching to.
And as always, if you have any questions about this or anything else involving the standards, our products or eLearning, ask us anything! Happy building!